
5 Techniques to Taking Better Pictures
/Everyone wants to take better pictures but how do you go about doing that? Do you need to take classes or attend a workshop? Those are good ideas if you want to improve your photography but can be costly and time intensive. Do you need to go buy better equipment? Again that's costly and while new equipment can unlock what's already there, technique is what is needed. More editing filters? No.
Thankfully, photography takes a lifetime to master and there is always something to learn and apply. Some techniques are going to require lots of practice while others are general knowledge that will help immediately. These are five easy steps that you can take today to help improve your photography.
The Rule of Thirds
The rule of thirds states that an image should be imagined as divided into nine equal parts by two equally spaced horizontal lines and two equally spaced vertical lines, and that important compositional elements should be placed along these lines or their intersections. Think of a grid when looking through your camera on your phone or camera, generally speaking subjects that are along the intersections are going to be "more interesting" that if placed in the center of the frame. Applying the rule of thirds is going to take practice but here's an image to illustrate the rule of thirds.

As you can see above, the rule of thirds can help you with composition and arranging your subjects within the frame. While in Iceland, we had a chance to photograph a bunch of puffins and I captured this picture there. While not this image isn't perfect, the four intersections act as guidelines to where subjects should be placed. The puffin on the left is on the left third of the image near an section and the puffin on the right third actually has its wing at an intersection. Applying the rule of thirds can help create more interesting pictures from a composition standpoint, but contrary to its name, it's not a rule but more of a guideline. Whenever I'm taking portraits, I try to apply the rule of thirds because I prefer not to have my subject in the center of the frame.

In the portrait above, I placed the couple on the right side of the center and got my subject, their faces, right near an intersection and away from the center of the frame. This photo is one of my favorite portraits because the lighting and I think the composition works really well. Let's look at the same scene with the couple in the middle of the frame and see how that changes the feel of this photo.
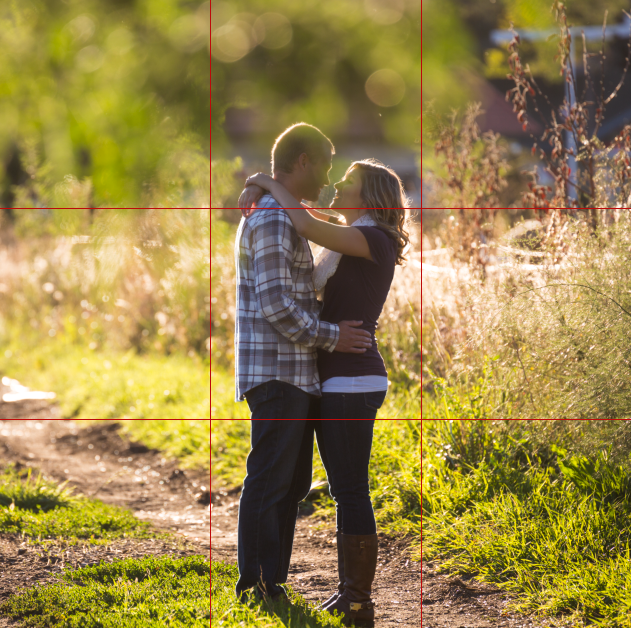
While this isn't the best example because the couples' faces are still above the center of the frame, I think this composition is pretty distracting. The road that they're standing on leads away from the couple, rather than above where it leads to the couple. Again, the rule of thirds is supposed to be a guideline and sometimes having the subject in the middle of the frame works really well.
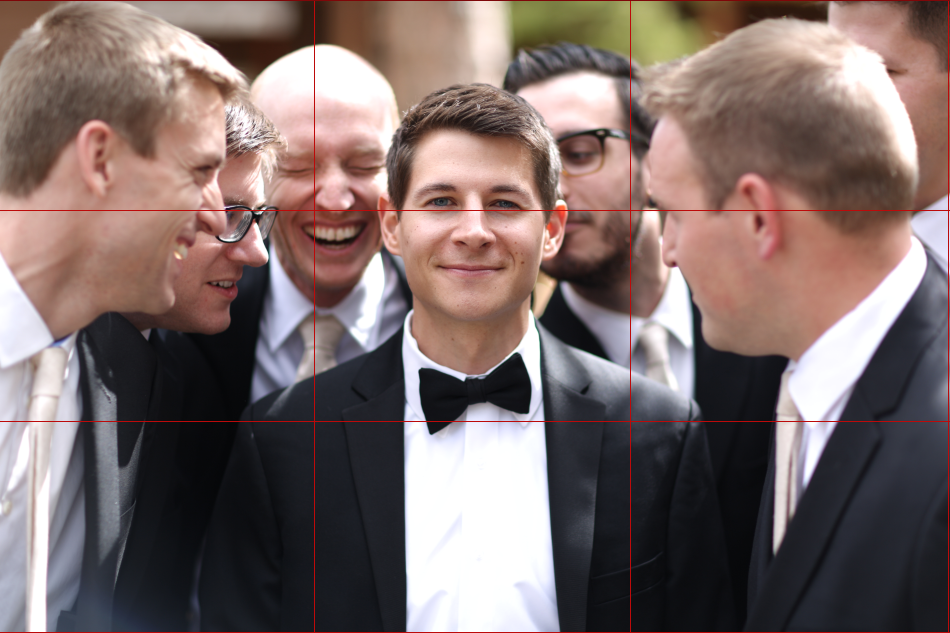
Here's a photo from a wedding that I shot for a friend and the idea here was the surround the groom with his groomsmen and getting them very close to him. This works because the groom is the subject and is in the center of the frame but the frame is filled with subjects around him bringing a balance to the photo. I didn't place the groom's head lower in the frame but this still illustrates the point.
Action item to help you improve: experiment with the rule of thirds. When does it work? When does placing the subject in the center of the frame work?
Keep an Eye on the Weather
It doesn't take critical thinking to know that weather can play a big part in a photo, fog tends to be more moody, dark, and mysterious whereas a sunny day with lots of green and blue evokes a feeling of peace and joy. Think of the classic Windows XP background "Bliss" with that green hill and the blue sky, it's peaceful and it's no wonder that Microsoft named that desktop theme Bliss. But how can the weather help your photography? Say you wanted to take some portraits around noon and the weather is supposed to be sunny. Most likely, that means having to contend with harsh shadows and bright light, two elements that can present difficulty for cameras. If you take those same portraits at noon on a cloudy, overcast day the light is going to be even and those harsh shadows are softened greatly therefore creating a more pleasing portrait.
Keep an eye on the weather and if you're taking photos in less than perfect weather, odds are that your photos will be more interesting than they would be with clear, blue skies. While shooting an engagement photo session, the weather was pretty poor but it made for a perfect backdrop for the young couple who were getting engaged. Editing these photos was a breeze because of the even lighting on their faces and I didn't need to adjust the exposure, highlights, or shadows all that much.

Action item for keeping an eye on the weather is take photos in different weather conditions to see what you can create. Just be safe out there!
Change Your Perspective
Perspective is everything when it comes to photography and one surefire way to instantly improve your photography is to find a new perspective to shoot from, be it getting low or going up to higher ground, you'd be surprised what you can do with a change of perspective. Just a forewarning on this one, changing perspective is going to mean that you're going to take lots of lackluster pictures before you find that perspective that works best. One of my favorite perspectives to shoot from is a lower perspective because it's unusual for us to see things from such a low perspective. With the rise of aerial photographer thanks to drones, getting a higher perspective is becoming more and more popular and widespread. A key element of changing your perspective is to try to visualize the shot beforehand and then see if you can achieve or improve upon that visualization.
There are so many compositionally interesting ways to change your perspective that you're shooting from and as I mentioned above, getting a lower perspective is really interesting for me. One of the photos below is a prime example, a puddle in an alley in a city isn't very interesting. In fact, you'd be hard pressed to find anyone who would see something beautiful about a puddle like that. But in the hands of a skilled photographer and a low perspective, you get a shot like this one.

1,170 Likes, 38 Comments - Colorado Long Exposure (@denver_afterdark) on Instagram: ". D E N V E R 🕸 A F T E R D A R K Colorado | Long Expo | Twilight..."
One of my favorite images that I have created was during sunflower season here in Denver a couple of years ago, I have numerous shots with the camera above the sunflowers and a dramatic sky in the background but I wanted to find something new. So I put the camera at the level of the sunflowers and captured the setting sun in between two sunflowers at a high aperture to make the sun look like a star.

Action item for changing your perspective would be to simply; look down. What do you notice that you wouldn't have otherwise? Try exploring a low perspective and a reflection if you can find one.
Get in Closer
Often times when we're taking pictures of something, we have an idea of what we want to have in the background. Living in Colorado, a lot of times people want mountains in the background of a photo and that is perfectly reasonable. But if we're going to push ourselves to instantly improve our photography that means that we have to open ourselves up to the world of details. There is almost an alternate world when you get in close and examine the details, seasoned photographers called this "macro photography" and it can be achieved just by getting closer to small subjects like flowers, plants, insects, etc.
One of my good friends doesn't own a DSLR and only takes pictures using her Samsung Galaxy S7 and yet she comes away with these brilliant macro photos just by putting her camera mode on "macro mode". She's made prints of some of her close up shots and they look great, much better than anything I have ever captured using my macro lens. When you're hiking, stop and look down. Then see what you find when you start getting in close to the tiny world that exists within our own.
Another technique for getting in close is called "filling the frame" and that is simply where your subject fills the vast majority of the camera frame, whether you're taking close up portraits, macros, or just zooming in on a nearby feature; filling the frame will put the whole focus on the subject with nothing to distract the eye or lead it away from the subject.

Action item for getting in close would be to try to fill the frame with a subject and with the same subject take another photo further away. What difference in stories do the pictures tell?
Take Lots of Pictures and Ask for Critique
Of everything on this list, this tip might be the hardest to implement because it involves putting something that you created on display and asking for someone's opinion of it. It can be a frightening thing. If you're serious about improving your photography, look through lots of images and then ask for critique on what you feel are your best shots. And when I say "look through lots of images" I do not mean scrolling mindlessly through Instagram double-tapping away. Rather, look at a photo. What is the story of that image? What is interesting about the photo? Why is that interesting? Does that image have good composition, good colors, good lighting, etc. and critique that picture. Then, here's the hard part, put your best shots in front of someone and ask for their honest feedback along the same lines.
It's easy to think that what we are creating is best because we understand it completely, but I have sold prints of pictures I would have never bought. I sold a print of a terrible picture (in my opinion) and yet this person bought it and valued it enough to hang on one of her dining room walls. How good a picture is, is entirely subjective on who is looking at the picture. For example, Peter Lik makes a fortune off selling landscape photos printed on Fuji SuperGloss paper. There's no mystery to that. However, Peter Lik has "sold" his process as completely unique and not found anywhere else and therefore his pictures sell for record amounts. If I were to give a critique of his photography, it wouldn't be kind but that doesn't stop people from collecting his work. What this boils down to is ask for feedback but develop your personal style, your personal voice, and your photography will improve with having to spend a dime on new gear.

For example, I love this photo I took in Glacier National Park but I've never sold a print of this photo and most likely I probably won't. I asked for feedback and I received some valuable feedback like the sky goes from unnaturally blue in the upper right corner straight into blushing pink just above the mountains. That was a mistake in editing but I still have a print of this framed and hanging in my living room because I love looking at it.
Have you tried any of these methods to improve your photography? What result did you see and what did you learn? Share in the comments and let me know if you disagree with me or if you're now going pro in photography because of this list.
Action item for taking lots of pictures and getting feedback is pretty self-explanatory, give a critique and request a critique.
